

A collection of Belinda Jeffery recipes to see you through the festivities. Our gift to you.
It's getting busy out there. But Galah is here to help.
First, we’ve mined our archive of Galah food columnist Belinda Jeffery's menus and pulled out a collection of recipes (below) that might just save your skin in the festive weeks to come. Among these is a most delicious slow-roasted beef recipe. This is my go-to when I'm short on mental capacity, but still want to cook something delicious for a big group of people. It's a breeze and always works.
Second, if you're wondering what to give the teachers, doctors, neighbours and colleagues in your life, go no further than Galah – a magazine that feels like a book – and it lasts longer than a bottle of wine.
Annabelle x
PS, we only have about 230 copies of Issue 13 left, so if you're thinking about buying it, now might be a good time.

We've mined the rich seam of Belinda Jeffery's Galah recipes to match whatever festive cooking occasion comes your way these holidays.

Belinda: For my taste, the best way to eat olives is to warm them through with olive oil, garlic and herbs. Suppose you'd like to try a batch. In that case, all you need do is stir together 360 g olives (I tend to use a mixture of tiny niçoise, shiny black kalamatas, and bright green Sicilian olives for this, but really any will do), 200ml extra-virgin olive oil, a clove of crushed garlic, several sprigs of thyme, rosemary or oregano, and 3 teaspoons of balsamic vinegar.
Put everything into a saucepan and very gently heat the mixture until the olives are warm. Turn off the heat and let them sit at room temperature for at least 6 hours to allow the flavours to develop. Just before you serve them, reheat the olives then spoon them into a serving bowl. As one of my students said on first tasting them, "I'm never going to eat olives any other way again." Store any leftover olives in the fridge.
Originally published in Galah Issue 5.

Belinda: This rustic chicken dish is a real winner. I cook variations of it all the time as it's such a successful way to cook chicken, and the resulting smoky, lemony cooking juices are delicious with it. Just make sure everybody gets some succulent roasted garlic cloves to squeeze onto their chicken. The recipe doubles well, but if you do this, make sure you roast it on two trays so it's spread out, which allows the chicken skin to brown and crisp.
8 skin-on chicken thigh cutlets (bone-in)
1 large lemon sliced into 5mm thick rounds
2 whole heads of garlic, halved crosswise
18 Sicilian green olives
Thyme or fresh bay leaf sprigs, to garnish
Chicken marinade
100ml extra virgin olive oil
2 fat cloves garlic, finely chopped
Zest 1 large lemon, finely grated
¼ cup (60ml) lemon juice
3 bay leaves
1 tablespoon thyme leaves
1 tablespoon smoked paprika
2 teaspoons sea salt
Freshly ground black pepper, to taste
Combine all the chicken marinade ingredients in a large bowl and thoroughly mix. Add the chicken cutlets, lemon slices, and halved garlic heads, then swish them about so they're really well coated in the marinade. (It's a good idea to slip on a pair of food prep gloves and do this with your hands to ensure everything is well coated.)
Line a container that will hold the chicken mixture comfortably with a plastic bag. Scrape the mixture into the bag, then knot the bag tightly. Seal the container and pop it in the fridge for at least 5 hours or preferably, overnight. Occasionally give the bag a good squish. (The longer you leave the chicken, the more imbued it will become with the flavours. That said, I've made this and cooked it almost straight away, and it has still been delicious.)
When you're ready to cook the chicken, preheat your oven to 190C.
Line a large shallow baking tray with foil, then baking paper. Empty the chicken mixture onto the tray. Sit the chicken cutlets in a single layer, skin-side up, and tuck the garlic halves and lemon slices around them. (If you want to sit a slice of lemon on each piece of chicken, do so, it looks lovely once it's cooked). Pop the tray in the oven and roast the chicken for about 40 minutes, until it's deep brown and cooked through but tender. Add the olives in the last 5 minutes of cooking.
Remove the baking tray from the oven and transfer everything, including any juices, to a large serving platter. Garnish with herb sprigs.
Originally published in Galah Issue 4.

Belinda: I owe this fantastic technique for slow-cooking beef to my lovely publisher, Julie Gibbs, who rattled it off to me during one of our chats about all things culinary (I have a feeling the idea originated with that wonderful cook, Maggie Beer.) It's a brilliant, easy-as-pie way to achieve rosy, perfectly-cooked beef, and I have used it in no end of ways since I learned of it. In this case, the beef is paired with a simple salad of heirloom tomatoes.
Approx. 1.8 kg beef fillet (ask your butcher to trim off the silvery skin)
1½ tablespoons olive oil A bundle of fresh herb sprigs Tomato and onion
½ cup (120ml) extra virgin olive oil
3 teaspoons red wine vinegar
1 teaspoon sea salt flakes
1 teaspoon Dijon mustard
1 small golden shallot, finely chopped
1.2 kg ripe heirloom tomatoes (a mixture looks lovely, but all of one kind is fine too)
1 ½ red onion, finely sliced
1 small clove garlic, finely chopped
Tiny basil leaves
Beef fillet has a skinny tail-end which cooks more quickly than the thicker part, so tuck this under the fillet and secure it with kitchen string. Tie the rest of the fillet at 5 cm intervals with more string as this will help it to cook evenly and keep its shape. Bring the beef to room temperature, this is important, and pat it dry with paper towel.
Preheat the oven to 80C.
Heat the olive oil in a large, heavy-based frying pan over high heat. Add the fillet to the pan and sear it quickly until browned all over. Transfer the fillet to a roasting tin, pour any remaining oil from the pan over it, and pop it in the oven. Cook the beef for 3½ hours, turning it over once, then remove it from the oven, tent it loosely with foil, and leave it to rest in a warm spot for at least 20 minutes before carving into slices.
To make the tomato salad, put the olive oil, vinegar, salt, Dijon mustard, and golden shallot into a large bowl, and whisk until thoroughly combined. Slice the tomatoes into wedges or halves, add them to the bowl along with the onion and garlic, and gently mix everything with your hands.
This looks best served family style. Simply overlap the beef slices down a long platter and garnish them with a bundle of herb sprigs. Spoon the tomato salad into a serving bowl and finish off with a sprinkle of tiny basil leaves. Serve the baba ganoush alongside.
Originally published in Galah Issue 6.

Belinda: What is it about cheese biscuits and sparkling wine or Champagne? They're a made-in-heaven combination worthy of any celebration. The full recipe makes rather a lot of biscuits, so you could easily halve it. But there's something very comforting about having a roll tucked away in the freezer for a cheese-biscuit emergency.
2 cups (300 g) plain flour
1/3 cup (50 g) self-raising flour
1 teaspoon salt
½ teaspoon dried chilli flakes
½ cup (40 g) parmesan, freshly grated
1¾ cups (200 g) good-quality tasty or cheddar cheese, grated
250 g cold unsalted continental (cultured) butter, cut into small chunks
1½ tablespoons lemon juice, strained
nigella seeds or black or white sesame seeds, for sprinkling
Preheat the oven to 180C.
Put the flours, salt and chilli flakes into a food processor and whiz so they're well combined. Add the parmesan and cheddar and blend until the cheeses are mixed thoroughly. Add the butter and process until the mixture resembles coarse breadcrumbs. Drizzle in lemon juice and let the processor run until a ball of dough forms around the blade; don't be alarmed if this takes a minute or more.
Lay a large sheet of foil on your benchtop and cover it with a sheet of baking paper. Knead half the dough lightly into a ball, then shape it into a log about the diameter of a 50-cent piece. Sit the log along one long side of the baking paper and roll it up in the paper. Next, roll it in the foil. Twist the ends tightly in opposite directions so you end up with something that looks like a long bonbon. Do the same with the remaining piece of dough.
If you're baking the biscuits the same day, chill the logs for 213 hours in the fridge until they're firm enough to slice. Or at this stage, you can freeze the logs until you need them. (They keep well in the freezer for about 5 weeks; just defrost them in the fridge before slicing.)
Cut the logs into 5 mm-thick slices and place them on baking trays lined with baking paper. Press nigella or sesame seeds on top.
Bake for 15 minutes, or until the biscuits are golden and smell delicious. Remove from the oven, leave biscuits on trays for 1 minute, then transfer to a wire rack to cool completely. Store in an airtight container for up to 10 days.
Originally published in Galah Issue 7.

Belinda: This pretty compote goes beautifully with the Bircher muesli and luscious raspberry yoghurt. If cherries are a bit thin on the ground, replace them with extra berries.
Raspberry yoghurt
About 200 g raspberries (fresh or frozen)
1 tablespoon caster sugar, or more to taste
500 g thick plain Greek-style yoghurt
Compote
Finely grated zest of 2 large oranges
⅔ cup (160ml) freshly squeezed orange juice
100 g caster sugar
350 g cherries (fat, firm-fleshed ones are ideal), pitted and halved
300 g mixed berries (raspberries, mulberries, blueberries, blackberries, red currant clusters)
For the raspberry yoghurt, puree the raspberries and sugar in a food processor or blender. Taste and add more sugar if necessary. Scrape the puree into a fine sieve set over a bowl, and work the mixture through the sieve with the back of a spoon, it takes a bit of elbow grease. Discard the pulp left in the sieve; cover and chill the puree. Just before serving, scrape the yoghurt into a bowl, and swirl in spoonfuls of puree. Try not to over-stir, the ribbons of scarlet puree through the yoghurt look lovely.
For the compote, put the orange zest, orange juice and caster sugar in a medium-sized saucepan over medium heat. Stir until the sugar dissolves, then stop stirring and bring to the boil. As soon as it boils, add one-third of the cherries and one-third of the berries. Reduce the heat to low and simmer the mixture gently for 4 minutes.
Set a fine sieve over a bowl and strain the mixture. Set the cooked fruit aside, and return the juice to the pan. Increase the heat to medium-high, and cook the juice until it becomes syrupy (be careful it doesn't scorch), then set aside to cool.
Once the syrup is cool, gently stir in both the cooked and fresh fruit. At this stage, you can either serve the compote immediately or store it in a tightly sealed container in the fridg,e where it will keep well for a few days (although the berries do become softer over time).
Bircher muesli
There's always a container of homemade Bircher muesli in our fridge over summer, to be eaten with whatever fruits are at their peak. It's light but satisfying, and keeps well for up to 5 days.
2½ cups (225 g) traditional rolled oats
80 g natural sultanas
90 g roasted pecans or macadamias, coarsely chopped
1½ cups (375ml) soy milk (or regular milk)
1 cup (280 g) thick plain Greek-style yoghurt
2 small apples, grated
Dash of honey or maple syrup, optional
A large handful of blueberries
Combine oats, sultanas and nuts in a bowl. Add soy milk, yoghurt and 1 cup (250ml) water, and mix thoroughly. Cover the bowl and refrigerate overnight so the oats absorb the liquid.
Just before serving, stir in the grated apple and honey or maple syrup, if using. Spoon into a decorative bowl, scatter blueberries on top, and serve with the berry compote and yoghurt.
Originally published in Galah Issue 11.
Belinda: Skordalia is like a thick, garlicky mayonnaise, and something I try to keep on hand, as to my mind almost anything (within reason) tastes better with a dollop. I often double this recipe, because it disappears very quickly. It's fantastic with all sorts of barbecued seafood, and just as good spooned on steamed vegies or, as in this menu, used as a healthy dip for carrots, cucumber sticks, radishes, and celery stalks.
About 120 g stale pide bread
¼ cup (25 g) almond meal
3 cloves garlic, finely chopped
¾ teaspoon sea salt, or more to taste
½ cup (120ml) olive oil (I use a mixture of extra virgin and regular olive oils), plus extra for drizzling
1 tablespoon freshly squeezed lemon juice, or more to taste
1-2 tablespoons very hot water
Tiny herb sprigs or leaves, to garnish
Chunks of warm bread and a mixture of vegies, to serve
Remove the crusts from the pide bread (I know this is a little awkward to do, but the flavour and texture of the bread is perfect for skordalia), then weigh it, you need 60 g without crusts. Cut the bread into rough chunks and soak in ¾ cup (180ml) cold water for only 2 minutes (any longer and the bread will dissolve). Squeeze the soggy lumps of bread very tightly in your hands to get rid of excess water, the bread will clump together into a mushy dough. Put this, along with the almond meal, garlic and salt, into a food processor fitted with the steel blade.
Now, this next stage is the tricky bit, and the secret is patience. If the oil is added too rapidly, the mixture will split, just as regular mayonnaise can. Whiz everything together, then with the processor running, add the olive oil, drop by drop. As the mixture starts to come together, you can increase the flow of oil to a very fine stream (more like a thread, really.) The mixture should become very thick and creamy. About halfway through, add the lemon juice and a tablespoon of the hot water (this will thin the skordalia a bit). Continue adding the oil until it is all incorporated. Taste the skordalia and add a little more lemon juice, salt or hot water to thin, if necessary.
Now I have to fess up here that from time to time, when I've been hurrying, I've added the oil too quickly, and the skordalia has split. If the same thing should happen to you, I've found that immediately adding the lemon juice and hot water can quite often salvage it. However, it may need more of each than the recipe says, in which case you will need to adjust the final texture and flavour.
Spoon the skordalia into a container, cover it tightly (very tightly) and store in the fridge. Just before serving, scoop the skordalia into a serving bowl, sprinkle with herb leaves and sprigs, then drizzle the surface with a fine thread of extra virgin olive oil. Store leftover skordalia in an airtight container in the fridge for up to 1 week.
Originally published in Galah Issue 13.

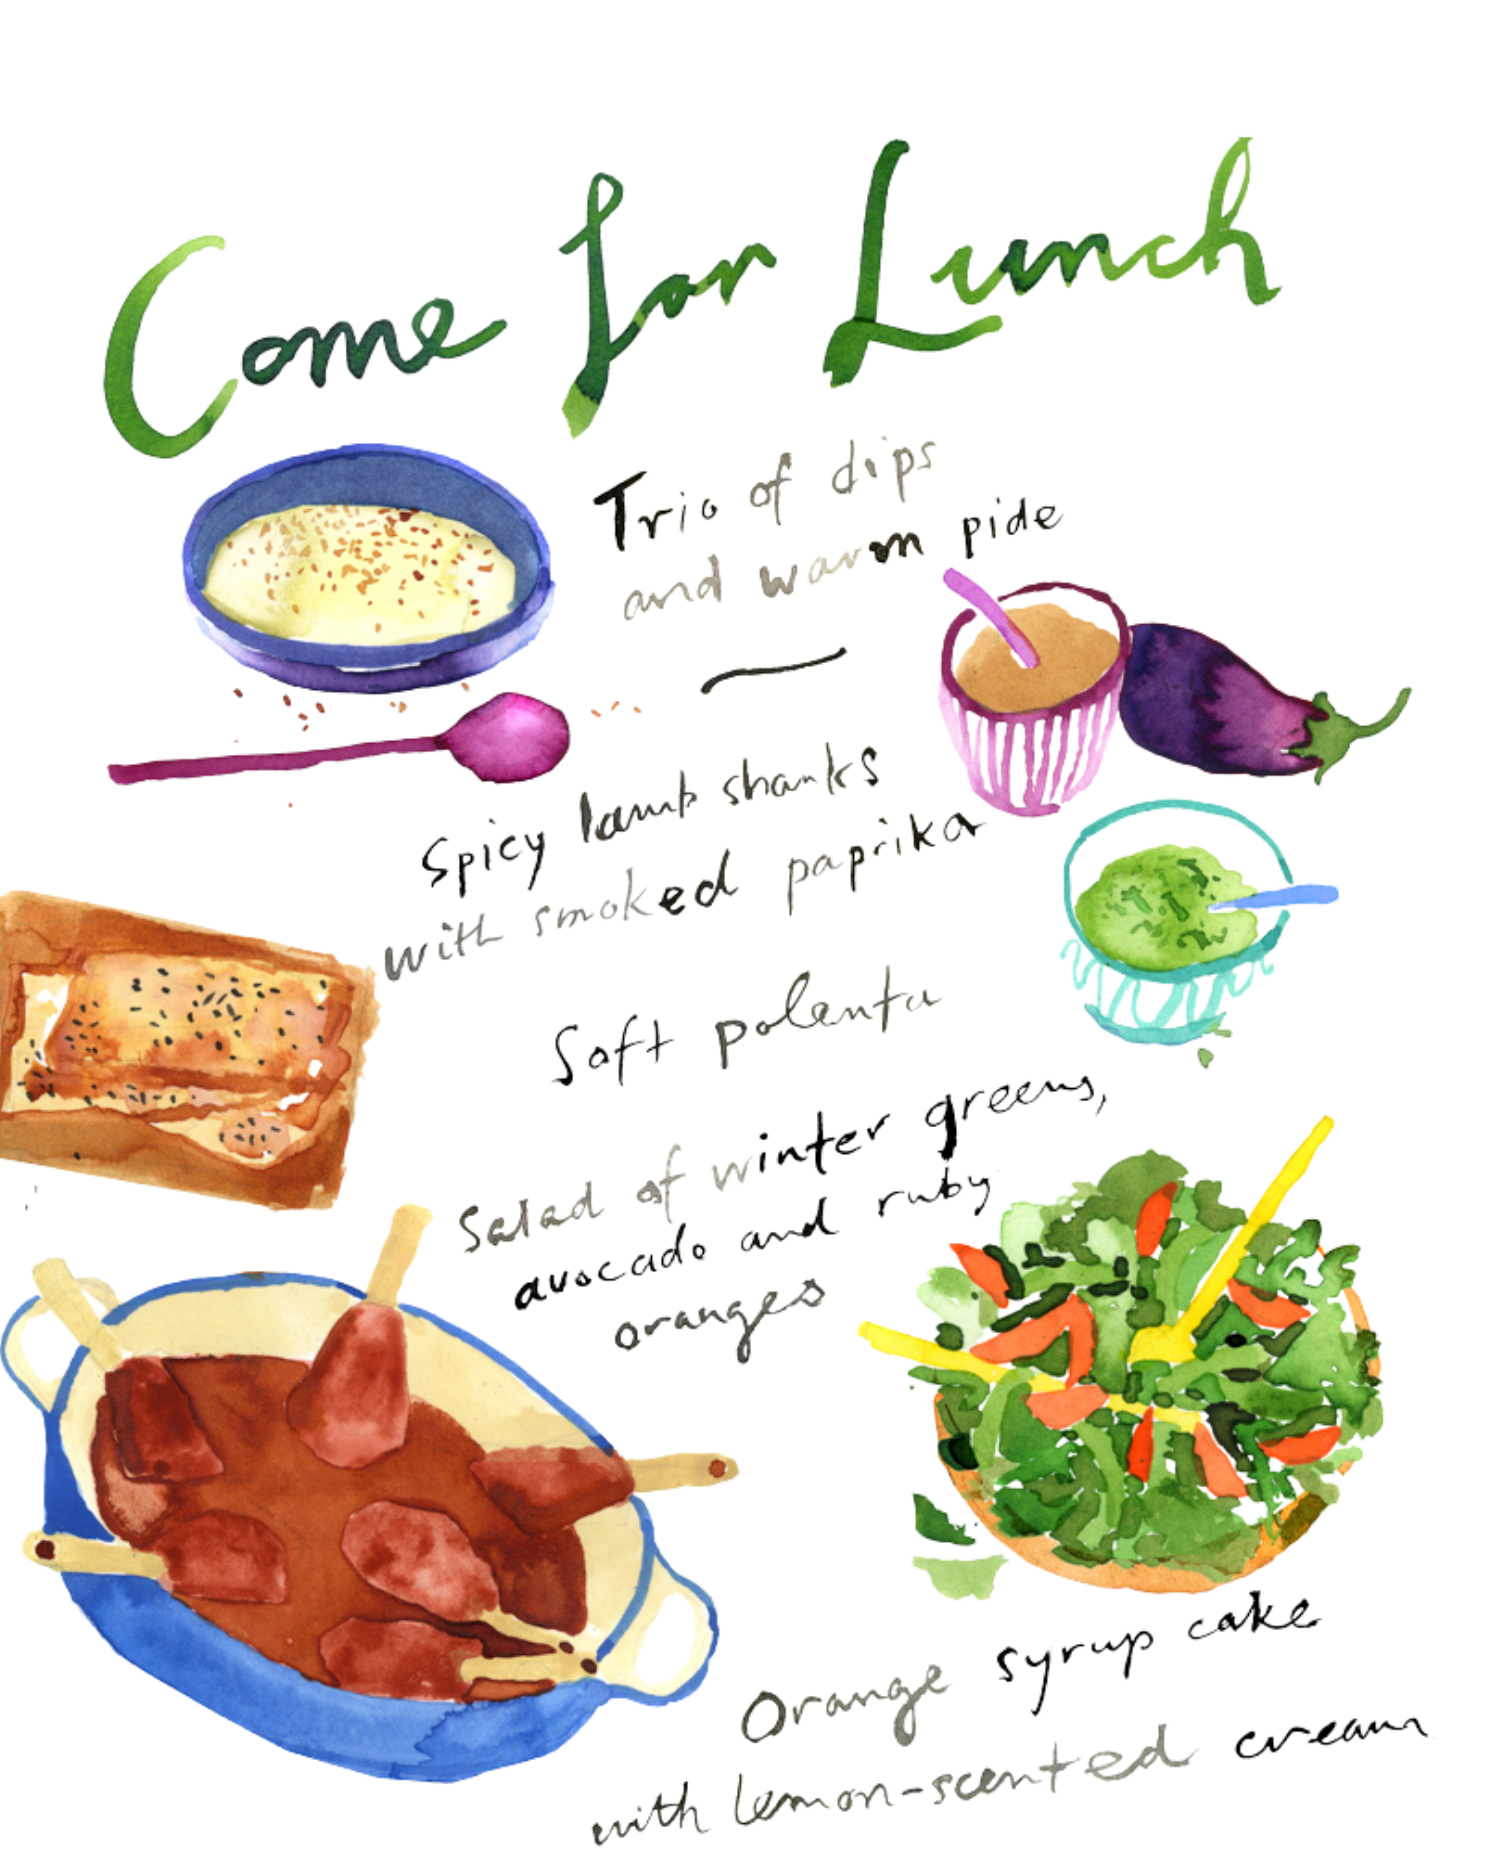
Goat's cheese labne and roasted hazelnut and almond dukkah + charred eggplant and ginger dip + avocado, green chilli and yogurt dip. Yes, please.
180 g marinated goat’s cheese in olive oil and herbs, well drained
600 g thick Greek-style yoghurt
¼ teaspoon sea-salt flakes
extra virgin olive oil, for drizzling
roasted hazelnut and almond dukkah, for sprinkling (see recipe below)
warm pide, to serve
For the labne, suspend a large, fine sieve over a bowl, making sure it doesn’t touch the bottom. Line the sieve with a double layer of muslin, leaving an overhang all around.
In a medium-sized bowl, mash the goat’s cheese with a potato masher to make it as smooth as possible. Add a large dollop of yoghurt to the bowl and thoroughly mix into the cheese (a balloon whisk is helpful here). Add another dollop of yoghurt and repeat, then add the remainder along with the salt and mix until smooth.
Scoop the yoghurt mixture into the sieve, then draw the muslin up over the top, pressing down gently. Cover the whole lot with cling film and pop the bowl into the fridge for 24 hours. Next day discard the liquid collected in the bowl.
To serve, scoop the labne into one or two shallow serving bowls. Use the spoon to create peaks and troughs. Drizzle a little olive oil over the top so it catches in the troughs, then sprinkle with dukkah. Serve with warm sliced pide.
You can buy ready-made dukkah, but it’s quick to make and so much nicer when freshly ground. In its various homelands, families grind their favourite mixtures of sesame seeds, toasted nuts, and spices such as cumin, coriander, and fennel seeds. This recipe makes more dukkah than you’ll need, however it keeps well in an airtight jar for up to a fortnight. It’s delicious sprinkled on warm pide that’s been dunked in good extra virgin olive oil.
50 g blanched almonds
40 g hazelnuts
1 tablespoon coriander seeds
2 teaspoons cumin seeds
1 ½ tablespoons sesame seeds
1 ½ tablespoons black sesame seeds
½ teaspoon sea salt flakes
¼ teaspoon coarsely ground black pepper
2 teaspoons dried thyme
Preheat the oven to 175°C (or 160°C fan forced).
Spread the almonds on a small baking tray and roast for about 6 minutes or until pale brown and smelling toasty. Remove and cool, then chop coarsely.
Spread the hazelnuts on a separate baking tray and roast for about 8 minutes, or until the skins are splitting and the nuts smell toasty. Remove from the oven and funnel them into a clean, dry tea towel. Form a pouch around the hazelnuts with the tea towel and twist the top to secure them. Bang the pouch on a benchtop to help loosen the skins, then rub between your hands in the tea towel until most of the skin flakes off. Chop roughly, leaving some of the pieces quite large.
Add coriander and cumin seeds to a small frying pan over low-ish heat and cook, stirring constantly, until they’re dark and fragrant, taking care not to let them burn. Tip into a bowl. Add both kinds of sesame seeds to the pan and cook for a couple of minutes until the creamy ones turn golden. Add to the bowl of spices.
Use either an electric spice mill or mortar and pestle to grind the spices and seeds to a coarse powder. If you’re using a spice mill, pulse the mixture otherwise it will grind too finely. Tip the mixture into a bowl, add the nuts, then stir in salt, pepper and dried thyme.
Leave the mixture to cool, then scoop into a jar with a tight-fitting lid. It will keep for a couple of weeks.
750g (about 2 large) firm, shiny-skinned eggplants
¼ cup (60 g) tahini
1 small clove garlic, very finely chopped
½-1 teaspoon finely chopped fresh ginger, or more to taste
2 ½ tablespoons (50 ml) freshly squeezed lemon juice
1 tablespoon extra virgin olive oil, plus extra for drizzling
½ teaspoon sesame oil
1 ½ teaspoons sea salt flakes, or more to taste
tiny herb leaves or spray-free edible flowers, to garnish
Preheat the barbecue to high. Place a wire rack over a plate and set it aside.
Prick each eggplant about a dozen times with a fine skewer, then sit them on the barbecue. If your barbecue has a lid, close it. Otherwise, upturn a large, stainless-steel bowl over the eggplants to mimic a lid. Cook, turning eggplants regularly with tongs, for 25-30 minutes or until the skin has blistered and blackened all over. The eggplants will have collapsed and the flesh will feel very soft when gently prodded; smaller eggplants will take less time to cook.
Move the eggplants to the wire rack and leave for 15 minutes or until they’re cool enough to handle. Halve the eggplants lengthwise, and drain away any liquid that pools around them. Use a spoon to scrape the creamy flesh from the charred skin, then add to a medium-sized bowl and mash with a fork or potato masher to form a chunky puree.
Add the tahini, garlic, ginger and lemon juice to the bowl and mix thoroughly with a spoon. Finally, use the spoon to beat in the olive oil, sesame oil and salt – the mixture will become lighter and fluffier as you do this. Taste the eggplant mix and adjust the flavours to suit. Set aside in a cool spot.
To serve, scoop the eggplant dip into a serving bowl, drizzle a little extra olive oil and garnish with a sprinkle of tiny herb leaves or edible flowers. It keeps well in the fridge for up to 5 days.

This dip is so easy to make it doesn’t require a “proper” recipe. It’s particularly flavourful through the cooler months when avocados are rich in oil.
Simply scoop the pulp of 2 avocados into a bowl. Mash roughly with a fork, then add a couple of tablespoons of freshly squeezed lemon or lime juice, 1 small finely chopped green chilli, a clove of finely chopped garlic, a couple of tablespoons of thick Greek yoghurt, 2 tablespoons of extra virgin olive oil, and about ¾ teaspoon sea salt or more to taste. Mix, taste, and adjust the flavours to suit. I like it to be quite lemony and refreshing. Scoop the mixture into a serving bowl, swirl a spoonful of yoghurt over the top, then finish with a drizzle more olive oil, freshly ground black pepper, and a scatter of tiny parsley or coriander leaves.
Sit one or two loaves of pide on an oven tray lined with baking paper. Brush the top liberally with extra virgin olive oil and sprinkle about 1 teaspoon of sea salt flakes and ½ teaspoon of nigella seeds over the top. Pop the tray in a 175°C (or 160°C fan forced) oven for about 10 minutes to warm the bread through and slightly crisp the top. To serve, slice and pile into a basket or bowl.
Originally published in Galah Issue 10.